Tuesday, September 17, 2013

Lost Of SYSADMIN Password . How To Know The Password Of The SYSADMIN User


Oracle Application Object Library - Version 11.5.10.0 and later

GOAL

You lost the password of the user SYSADMIN. How can you identify the password for the SYSADMIN user ?

SOLUTION

The password of SYSADMIN is encrypted in the database, so if you forget it, it is not possible to retrieve it.

The only way is to change it. To change it, you can apply one of the following steps :


1 - log with a user which has the System Administrator responsibility, Go to the define User forms ,
then change the password by typing the new password in the field Password.

2 -From unix , run FNDCPASS to change the password :
FNDCPASS / 0 Y system/ USER sysadmin
Also please review the Note 423274.1 for changing the SYSADMIN password using FNDCPASS.

Multiplexing control files using SPFILE OR PFILE

Multiplexing control files using SPFILE OR PFILE

Multiplexing Control file using SPFILE

SQL> show parameter spfile

NAME                                 TYPE        VALUE
------------------------------------ ----------- ------------------------------
spfile                               string      /u02/abcprod/db/tech_st/11.2.0
                                                 /dbs/spfilePROD.ora

SQL> select name from v$controlfile;

NAME
--------------------------------------------------------------------------------
/u01/abcprod/db/apps_st/data/cntrl01.dbf
/u01/abcprod/db/apps_st/data/cntrl02.dbf
/u01/abcprod/db/apps_st/data/cntrl03.dbf

SQL> ALTER SYSTEM SET CONTROL_FILES = '/u01/abcprod/db/apps_st/data/cntrl01.dbf'
  2  ,'/u02/abcprod/db/tech_st/11.2.0/prod_controlfile/cntrl02.dbf',
  3  '/u03/abcprod/prod_controlfile/cntrl03.dbf' SCOPE = SPFILE;

System altered.

SQL> shutdown immediate;
Database closed.
Database dismounted.
ORACLE instance shut down.
SQL>

Using cp or mv command to copy or move the control file to their location.

$ cp cntrl02.dbf /u02/abcprod/db/tech_st/11.2.0/prod_controlfile/
$ cp cntrl03.dbf /u03/abcprod/prod_controlfile/


Start the database

SQL> startup

SQL> select name from v$controlfile;

NAME
--------------------------------------------------------------------------------
/u01/abcprod/db/apps_st/data/cntrl01.dbf
/u02/abcprod/db/tech_st/11.2.0/prod_controlfile/cntrl02.dbf
/u03/abcprod/prod_controlfile/cntrl03.dbf

SQL>


Multiplexing Control file using PFILE

Shutdown the database

Edit the control_files parameter from init_ORACLESID.ora file

control_files='/u01/abcprod/db/apps_st/data/cntrl01.dbf',
'/u02/abcprod/db/tech_st/11.2.0/prod_controlfile/cntrl02.dbf',
'/u03/abcprod/prod_controlfile/cntrl03.dbf';

save the pfile

Now move or copy the control files to their appropraite locations using cp or mv command

Start the database

How to setup an IMAP server on LINUX for E-Business Suite usage

How to setup an IMAP server on LINUX for E-Business Suite usage


APPLIES TO:

Oracle Workflow Cartridge
Linux x86
Oracle Application Object Library - Version: 11.5.5 to 11.5.10
GOAL

This note will guide you through the steps to allow you to set up an IMAP server so that you can respond to Notifications via e-mail and fully implement the "Forgot Password" functionality.
SOLUTION

1. Install Dovecot IMAP/POP3 Mailer
- check if dovecot is installed
$ rpm -q dovecot

- Download dovecot-0.99.13-1.2.el4.test.i386.rpm if needed
( http://dag.wieers.com/packages/dovecot/ )


2. Install sendmail-mc if it is not installed


3. Create directory structure for dovecot if needed
- /var/run/dovecot/login
- /var/run/dovecot-login


4. Setup sendmail by editing mail configuration files

a. Look for and edit the following lines as needed in /etc/mail/sendmail.mc. Remove the "dnl" at the beginning of the line to make the line active.  Replace the IP address and host with your local values.

- LOCAL_DOMAIN(`AOL-linux.us.oracle.com')dnl
- MASQUERADE_DOMAIN(AOL-linux.us.oracle.com)dnl
- MASQUERADE_DOMAIN(AOL-linux)dnl

Change the following line to allow connection from the Internet. Be aware that this opens up your sendmail to public access.

From:
DAEMON_OPTIONS(`Port=smtp,Addr=127.0.0.1, Name=MTA')dnl
To:
DAEMON_OPTIONS(`Port=smtp, Name=MTA')dnl


b. Add a line with your IP Address in /etc/mail/access
###.##.##.### RELAY

c. Add your hostname and full qualified hostname as needed in /etc/mail/local-host-names
AOL-linux.us.oracle.com
AOL-linux

d. Add mail accounts as needed in /etc/mail/virtusertable
applmgr@AOL-linux.us.oracle.com applmgr
wfmailer@AOL-linux.us.oracle.com wfmailer

e. Compile the mail configuration files
- $ make

f. Restart the sendmail service
- $ service sendmail restart


5. Setup dovecot by editing /etc/dovecot.conf. Edit and/or add the following lines as needed. These values are set for small usage and most defaults are being used for processes. Remove the comments (#) from any lines as needed.


Change the following and/or remove comment:

protocols = imap pop3
default_mail_env = mbox:~/mail:INBOX=/var/mail/%u
auth_userdb = passwd
mbox_locks = fcntl

base_dir = /var/run/dovecot
login_dir = /var/run/dovecot/login
imap_listen = *
pop3_listen = *
login_executable = /usr/libexec/dovecot/imap-login
login_user = dovecot
login_executable = /usr/libexec/dovecot/pop3-login
imap_executable = /usr/libexec/dovecot/imap
pop3_executable = /usr/libexec/dovecot/pop3
auth_executable = /usr/libexec/dovecot/dovecot-auth
auth_count = 1

These are already defaulted:

login = imap
login = pop3
auth = default
auth_mechanisms = plain
auth_user = root


6. Start the dovecot service (root user)

$ service dovecot start


7. Test connect to sendmail account testmail

$ telnet testsystem.domain 25
$ helo  
$ quit

Example:

$ telnet testsystem.domain 25
Trying ###.#.##.###...
Connected to testsystem.domain (###.#.##.###).
Escape character is '^]'.
220 testsystem.domain ESMTP Sendmail 8.13.1/8.13.1; Fri, 3 Mar 2006 15:24:02 -0500
helo AOLTest-sun
250 testsystem.domain Hello testsystem.domain [###.#.##.###], pleased to meet you
quit
221 2.0.0 testsystem.domain closing connection
Connection closed by foreign host.


8. Test connection to the Dovecot IMAP vaild user - i.e. "testmail" with password "testmail1"

Type the following three commands:

$ telnet testsystem.domain 110
$ user testmail
$ pass testmail1

Example:

$ telnet testsystem.domain 110
Trying ###.#.##.###...
Connected to testsystem.domain (###.#.##.###).
Escape character is '^]'.
+OK dovecot ready.
user testmail
+OK
pass testmail1
+OK Logged in.
quit
+OK Logging out.
Connection closed by foreign host.


9. Configure an E-mail client to test you IMAP Server

Outlook 2000

a. Open Outlook

b. Click Tools -> Accounts

c. Click the [Add] button then choose “Mail” to create a new account

d. Choose the Account Name and click the [Next] button

e. Verify the email address (i.e. wfmailer@dovecot host.com)

f. Click the (next] button

g. Choose IMAP for the incomping Mail server

h. Enter the Server Name into the “Incoming Mail Server” and “Outgoing Mail Server” fields

i. Click the [Next] button

j. Enter the Username(wfmailer) and Password

k. Click the [Next] button

l. Choose the LAN connection type

m. Click the [Next] button

n. Click the [Finish] button to save the settings

o. Click the [Close] button on the “Internet Accounts” screen 

Oracle Applications MWA Configuration


Apply MWA patches
  1. Stop Oracle Applications Services (Apache, Forms, Concurrent Manager, Report Server).
[orajai1@jai0301e] /home/orajai1
Source Oracle apps environment
$ . $APPL_TOP/$CONTEXT_NAME.env
$cd $COMMON_TOP/admin/scripts/$CONTEXT_NAME
$ adstpall.sh stop apps/ (Only on concurrent manager node)
  1. Take name and number of invalid objects belongs to apps, mwa, inv schema.
    SQL> SELECT COUNT(1) FROM DBA_OBJECTS WHERE status='INVALID' AND OWNER='APPS'
Export Invalid objects name in excel sheet, to compare invalid objects after apply these patches in case of any issue.
SELECT object_name, object_type, owner, status FROM dba_objects WHERE status = 'INVALID' AND owner = 'APPS' ORDER BY 1, 2, 3
  1. Take backup of following directories on all applications tier (web/form as well concurrent manager).
$cp $FND_TOP/secure $FND_TOP/secure.
$cp $TNS_ADMIN/$CONTEXT_NAME $TNS_ADMIN/$CONTEXT_NAME.
$cp $IAS_ORACLE_HOME/network/admin/$CONTEXT_NAME $IAS_ORACLE_HOME/network/admin/$CONTEXT_NAME.
  1. Apply following MWA Patches using /staging/scripts/ikn_autopatch.sh script.
Noteà Sometime file version would be updated after running autoconfig. Autoconfig you need to run at end of installation of all patches. You need to make sure about file version using adident after running autoconfig.
# 4260471 Mobile Applications Telnet Screen is rendere
Duration : 30 Min
Check file version after patch installation
$ adident Header $MWA_TOP/bin/MWADIS
/opt01/app/jai1appl/mwa/11.5.0/bin/MWADIS:
$Header mwadis.oc 115.158.1159.5 2005/03/28 18:49:15 sthamman noship $
$Header mwacfg.lc 115.24.1159.2 2004/12/31 10:38:20 sthamman noship
$ adident Header $MWA_TOP/admin/template/mwactl.sh
/opt01/app/jai1appl/mwa/11.5.0/admin/template/mwactl.sh:
$Header mwactl.sh 115.53.1159.3 2004/11/17 10:03:19 sthamman ship
# 4577556 Mandatory Mobile Patch for 1159 Customer
Duration: 30
Check file version after patch installation
$cd $COMMON_TOP/java/oracle/apps/mwa/presentation/telnet
$ adident Header Options.class
Options.class:
$Header Options.java 115.17.1159.9 2005/09/30 04:12:05 ajohnson ship $
$ adident Header ProtocolHandler.class
ProtocolHandler.class:
$Header ProtocolHandler.java 115.133.1159.8 2005/05/18 13:32:12 ajohnson ship
# 4630366 Mandatory Mobile Patch for 1159 Customer
Duration 30 Min
$cd $COMMON_TOP/java/oracle/apps/mwa/presentation/telnet
$ adident Header Options.class
Options.class:
$Header Options.java 115.17.1159.9 2005/09/30 04:12:05 ajohnson ship
# 3869946 MOBILE PAGES FAILED TO OPEN
Duration 60 min
Check file version
$ adident Header $WMS_TOP/patch/115/import/US/wmsmenu.ldt
/opt01/app/jai1appl/wms/11.5.0/patch/115/import/US/wmsmenu.ldt:
$Header wmsmenu.ldt 115.29.11590.5 2004/09/16 19:13:01 htnguyen ship $
$ adident Header $FND_TOP/patch/115/sql/AFFMFUNB.pls
/opt01/app/jai1appl/fnd/11.5.0/patch/115/sql/AFFMFUNB.pls:
$Header AFFMFUNB.pls 115.36 2005/04/11 13:50:03 skghosh ship $
# 4345239 STOCK LOCATOR ISSUE IN THE SUB TRANSFER SCREEN
Duration 60 min
Check file version
$ adident Header $INV_TOP/patch/115/sql/INVITPSB.pls
/opt01/app/jai1appl/inv/11.5.0/patch/115/sql/INVITPSB.pls:
$Header INVITPSB.pls 115.108.11590.8 2005/05/27 16:07:52 mchemban ship $
$ adident Header $INV_TOP/patch/115/sql/INVLKFFB.pls
/opt01/app/jai1appl/inv/11.5.0/patch/115/sql/INVLKFFB.pls:
$Header INVLKFFB.pls 115.1.11590.3 2005/05/27 15:57:27 mchemban ship $
$ adident Header $INV_TOP/patch/115/sql/INVLKFFS.pls
/opt01/app/jai1appl/inv/11.5.0/patch/115/sql/INVLKFFS.pls:
$Header INVLKFFS.pls 115.1.11590.2 2005/05/27 15:46:14 mchemban ship $
$ adident Header $INV_TOP/patch/115/import/US/i4345239.ldt
/opt01/app/jai1appl/inv/11.5.0/patch/115/import/US/i4345239.ldt:
$Header i4345239.ldt 115.0 2005/05/27 15:33:22 mchemban noship $
  1. Compile all invalid objects and check if there is any new invalid objects.
  2. Check invalid object of INV and MWA schema and compile them manually if it is taking long
  3. We need to check MWA related configuration in auto context file on each middle tier , concurrent manager tier before running autoconfig.
  4. Make following changes in applications context file on each middle and concurrent manager tier and run autoconfig.
    jai0301e
    orbit.com
    error
    Yes
    10000000
    5
60
15
10
FALSE
10210
10200
10310
FALSE
FALSE
Check value for following tag in the application context file $APPL_TOP/admin/_.xml. Value for these port would be decided for production. We'll use last two digit of mwaPortNo same as last two digit of Apache Port.
e.g.
if Production port is 8010 then mwaPortNo would be 10210 and Dispatcher port 10310
10210
mwa.Dispatcher=%s_hostname%.%s_domainname%:%s_mwaDispatcherPort%
mwa.TelnetServer=%s_hostname%.%s_domainname%:%s_mwaPortNo%
Make sure Dispatcher and Telnet Server hostname is as per production requirement.
  • Run autoconfig on all web/concurrent manager tier.
  • $cd $SCRIPTS
    $ pwd
    /opt01/app/oracle/jai1comn/admin/scripts/JAI1_jai0301e
    $adautocfg.sh
    Enter apps password : *****
    Check autoconfig log on each tier (middle tier, concurrent manager tier).
    1. Run /staging/scripts/ikn_post_autoconf.sh on each node.
    Run ikn_post_autoconf.sh on both jai00108e and jai00208e.
    $cd /staging/scripts
    ./ikn_post_autoconf.sh ERMR_jai0108e ERMR ERMR1PPSSYS eierm
    1. Copy back the listener.ora and tnsnames.ora files from backup in 806 home and IAS home.
    2. Check the DBC files in $FND_TOP/secure and add given entry if not there.
      BATCH_VALIDATE_USER=GUEST
      BATCH_VALIDATE_PWD=ORACLE
      Make sure DBC file exists.
      -rwxr-xr-x 1 orajai1 dba 806 Feb 08 11:00 jai001_jai1.dbc
    3. Start applications services including concurrent manager.
    4. Email to Functional team to run given below "Concurrent Manager", which is part of post installation step of patch # 4345239 "Generate Stock Locator Flexfield definition for Mobile transactions"
    5. Compile invalid objects if there was any due to above concurrent program.
    6. Validate applications services
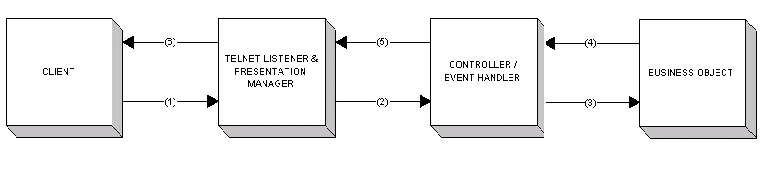
    Configure MWA
    We are going to use only MWA server for time being. Ensure mwa related
    setting are part of configuration file. Please perform as given below.
    1. Make given changes in $MWA_TOP/secure/mwa.cfg file.
    mwa.logdir= /log01/JAI1/mwa
    Rest of given below mwa related settings are part of autocontext file. Please cross check values for given variables in the $MWA_TOP/secure/mwa.cfg file
    File : $MWA_TOP/secure/mwa.cfg
    Variable Values:
    mwa.DbcFolder= /opt01/app/jai1appl/fnd/11.5.0/secure/
    mwa.DbcFile= jai0301e_jai11
    mwa.logdir= /log01/JAI1/mwa
    mwa.TelnetPortNumber=10210
    mwa.DropConnectionTimeout=5
    mwa.StaleSessionTimeout=60
    mwa.SystemLog=system.log
    mwa.LogLevel=trace
    Check Dispatcher setting
    Dispatcher related setting variable's values are already part of autocontext file. Please check values for following dispatcher related variables in the $MWA_TOP/secure/mwa.cfg file.
    [orajai1@jai0301e] /opt01/app/jai1appl/mwa/11.5.0/secure
    $ grep -i Dispatcher mwa.cfg grep -v "#"
    mwa.Dispatcher=jai0301e.orbit.com:10310
    mwa.DispatcherWorkerThreadCount=15
    mwa.DispatcherClientsPerWorker=10
    Change Default_key Files
    Please modify $MWA_TOP/default_key.ini file in JAI1 instance with following updates
    The changes required to be done are in $MWA_TOP/default_key.ini
    $ cp $MWA_TOP/default_key.ini $MWA_TOP/default_key.ini.mmddyyyy
    1) Change DEFAULT_WIDTH = 27
    2) Change DEFAULT_HEIGHT = 18
    3) Change PROMPT_RATIO = 1:2
    Performance Related Changes.
    Execute following SQL using APPS schema
    SQL> CREATE INDEX po.idx_rcv_tran_interface_prf1 ON po.rcv_transactions_interface
    (shipment_header_id,transaction_status_code)
    TABLESPACE pox COMPUTE STATISTICS ;
    SQL> CREATE INDEX inv.idx_mtl_onhand_quan_det_prf1
    ON inv.mtl_onhand_quantities_detail(lpn_id,organization_id)
    TABLESPACE invx COMPUTE STATISTICS;
    SQL> analyze table inv.MTL_SECONDARY_INVENTORIES delete statistics
    SQL> CREATE INDEX wsh.idx_wsh_delivery_details_prf1 ON wsh.wsh_delivery_details
    (source_header_number,released_status)
    TABLESPACE wshx COMPUTE STATISTICS;
    SQL> create index PO.idx_rcv_ship_headers_PRF1 ON PO.rcv_shipment_headers(EXPECTED_RECEIPT_DATE)
    TABLESPACE POX COMPUTE STATISTICS;
    Schedule Gather Schema Statistic for MWA
    Login to Oracle Applications and select "SYSTEM ADMINISTRATOR" and Submit gather statistics
    MWA Services Alert/Start/Stop Scripts
    /home/orajai1/start_mwa
    /home/orajai1/stop_mwa
    /home/orajai1/stat_mwa
    Start MWA Server
    Ensure script mwa_services has been deployed in $HOME to start services.
    Start mwa services using script
    $. ./start_mwa
    Validate MWA Configuration
    After copying scripts run /home/orajai1/start_mwa script to start MWA services. Allocate following responsibility to any user and perform given steps to validate configurations.
    "Materials & Mfg"
    Start à Run à telnet jai0301e.orbit.com 10210
    Noteà Only "Oracle Mobile Applications" repsonsbility would be visible in WMA telnet session.
    Appendix
    Start MWA services
    $ cat start_mwa.sh
    . $APPL_TOP/$CONTEXT_NAME.env
    export WMATELPORT=10250 # WMA Tel Net Server Port
    export WMATELPORT2=10260 # WMA Tel Net Server Port
    ulimit -n 1024
    echo "Starting the MWA Telnet Server ..."
    cd $MWA_TOP/bin
    nohup mwactl.sh -java_config "-mx128m -ms64m -Dmwa.cfg=$MWA_TOP/secure/$CONTEXT_NAME/mwa.cfg" start $WMATELPORT &
    sleep 30
    nohup mwactl.sh -java_config "-mx128m -ms64m -Dmwa.cfg=$MWA_TOP/secure/$CONTEXT_NAME/mwa.cfg" start $WMATELPORT2 &
    sleep 30
    if [ `ps -ef grep mwa grep -v grep wc -l` -eq 2 ]
    then
    echo "MWA Telnet Server is up now "
    else
    echo "WMA Telnet Server Did not start"
    fi
    cd
    Stop MWA services
    # You need instance sysadmin password to stop MWA server
    . $APPL_TOP/$CONTEXT_NAME.env
    export WMATELPORT=10250
    export WMATELPORT2=10260
    echo "Stoping the MWA Telnet Server ..."
    cd $MWA_TOP/bin
    mwactl.sh -java_config "-Dmwa.cfg=$MWA_TOP/secure/$CONTEXT_NAME/mwa.cfg" -mwatop $MWA_TOP -login SYSADMIN/ stop_force $WMATELPORT &
    mwactl.sh -java_config "-Dmwa.cfg=$MWA_TOP/secure/$CONTEXT_NAME/mwa.cfg" -mwatop $MWA_TOP -login SYSADMIN/gone2acpt stop_force $WMATELPORT2 &
    for i in `ps -ef grep mwa grep -v grep grep -v _mwa awk '{ print $2 }'`
    do
    kill -9 $i
    done
    echo "MWA Server and dispatcher is down ...."
    cd
    MWA Services availability Check
    $ cat stat_mwa
    # Description:This script will check mwa services and send notify DBAs if it was down.
    # Author: Janmejai Singh
    #
    # History
    ##############################################
    #! /bin/ksh
    maillist="jsingh@orbit.com"
    set -x
    if [ -f /tmp/run_it.txt ]
    then
    exit
    fi
    if [ `ps -ef grep -i mwa grep -v grep grep -v stat_mwa wc -l` -ne 2 ]
    then
    echo "MWA Server is down on `hostname` ." mailx -s "Please start MWA Services using $HOME/start_mwa.sh script ..." $maillist
    #echo "Please start MWA Services using `hostname` : $HOME/start_mwa script ..." mailx -s "MWA Server is down on `hostname` ." $maillist
    fi

    Mobile Web Applications Server - How to Start/Stop MWA Services Using Control Scripts adstrtal.sh/adstpall.sh

    Mobile Web Applications Server - How to Start/Stop MWA Services Using Control Scripts adstrtal.sh/adstpall.sh

    Oracle Mobile Application Server - Version 11.5.10.0 to 12.1.3 [Release 11.5 to 12.1]
    Information in this document applies to any platform.
    Information in this document applies to any platform.
    Mobile Application Server - Version: 11.5.10 to 12.1

    GOAL

    One would like to start/stop MWA services using respectively adstrtal.sh/adstpall.sh control scripts
    instead of the specific script mwactl.sh under $MWA_TOP/bin (11i) or INST_TOP/admin/scripts (r12).

    FIX

    1. Stop all the services (by running adstpall.sh under $COMMON_TOP/ in 11i or /admin/scripts in r12)

    2. For 11i only apply Patch 5985992 (TKX patch), Patch 5712178 (MWA patch) if not already done, and Patch 8405261 per Note 781107.1.

    3. For 11i or r12 modify value of s_mwastatus and s_other_service_group_status variables to 'enabled' (without quotes) in the xml
    context file $APPL_TOP/admin/.xml in 11i or $INST_TOP/appl/admin/.xml in r12 (where is generally _)
    4. Run Autoconfig
    5. Now the MWA services can be started/stopped as other Applications processes using the
    adstrtal.sh/adstpall.sh control scripts.

    Oracle Apps Cloning – Refreshing single instance Test database with RAC Production Data

    Oracle Apps Cloning – Refreshing single instance Test database with RAC Production Data

    As an Apps DBA, you will need to refresh your Test or Dev instance with production changes regularly.
     Sometimes, you need to create a complete clone of the Production and sometimes you might need to just refresh the data.

    Here, i will post the steps which are required to refresh the Test instance with the latest production data.

    Environment Information:

    1. Production (PROD) – R12.1.1. with 11.1.0.7 Database, 2 node RAC Database with 2 Redo Threads and 3 Redo Log Groups
     in Each Thread.

    2. Test Database (UAT) – R12.1.1 with 11.1.0.7 Database, Single Node Database.

    We assume that we can not bring down our production database for backups to be used for refresh.

    We will be taking hot backup for this refresh.

    step 1: Take a controlfile trace on production:

    bash$ sqlplus "/as sysdba"

    SQL> alter database backup controlfile to trace;

    Database altered.

    SQL> exit
    Now go to the trace directory:

    bash $ cd /db01/oraspprd/db/tech_st/11.1.0/admin/PROD_oraspapp/diag/rdbms/prod/PROD/trace

    bash $ ls -lrt

    In the bottom you will find the trace file among recently generated files. Normally, this trace file will be having size much more than the other trace files. Thus, by size, you can identify it. Open this file and check to confirm.

    Open this trace file and copy all its contents to notepad on your desktop machine.

    step 2: Take the Hot backup of your database.

    bash$ sqlplus "/as sysdba"

    SQL> alter system archive log current;

    SQL> alter database begin backup;

    SQL> select count(*) from v$backup where status='ACTIVE';

    SQL> exit;
    step 3:

    Create a backup directory e.g. backup_data and copy all the datafiles and redo logs to this backup directory.

    Once the backup completes, execute the following commands:

    bash$ sqlplus "/as sysdba"

    SQL> alter system archive log current;

    SQL> alter database end backup;

    SQL> select count(*) from v$backup where status='ACTIVE';

    SQL> alter system archive log current;

    SQL> alter system switch logfile;

    SQL> alter system switch logfile;

    SQL> alter system switch logfile;

    SQL> exit;
    Create another backup directory e.g. backup_arch and copy all the archive logs generated today to this backup directory.

    step 4: Bring your Test instance down.

    - Login to your Test instance as “applmgr” user and shut down the application tier services.

    Wait, check and verify that all the processes have stopped.

    - Login to your Test instance as “oracle” user and shut down the listener and database.

    Wait, check and verify that all the processes have stopped.

    - If you have spare space, rename the directory containing all your Datafiles, Redo Log and control files and create new empty directory with the same name. If you don’t have enough space on test machine, just remove all the Datafiles, Redo Log and control files.

    step 5: Copy backups to Test Server.

    - Copy all the datafiles and Redo Logs backed up to backup_data directory on production server to the directory which contains DBFs and Redo Logs on the Test server. Please do not copy any controlfiles. Check and if you see they are copied, remove them.

    - Copy all the archive logs backed up to backup_arch directory on production server to some directory on Test server e.g. to “/test01/arch”

    step 6:

    If you are also copying the Oracle Home from Production, then you also need to follow the following steps to configure the Oracle Home on Test server. However, if you are just refreshing the data and not binaries, you may skip this step and jump on to step 7.

    On Test server:

    bash $ PERL5LIB=`which perl`

    bash $ export PERL5LIB

    bash $ cd /u02/orauat/db/11.1.0/appsutil/clone/bin

    bash $ perl adcfgclone.pl dbTechStack
    step 7: Create control file creation sql script for Test instance.

    Now you need to edit the control file trace copied to your notepad in step 1.

    Here, goto #2. RESETLOGS case, and remove all  the lines before it. You will see something like this:

    --     Set #2. RESETLOGS case
    --
    -- The following commands will create a new control file and use it
    -- to open the database.
    -- Data used by Recovery Manager will be lost.
    -- The contents of online logs will be lost and all backups will
    -- be invalidated. Use this only if online logs are damaged.
    -- After mounting the created controlfile, the following SQL
    -- statement will place the database in the appropriate
    -- protection mode:
    --  ALTER DATABASE SET STANDBY DATABASE TO MAXIMIZE PERFORMANCE
    STARTUP NOMOUNT
    CREATE CONTROLFILE REUSE DATABASE "PROD" RESETLOGS  ARCHIVELOG
    MAXLOGFILES 32
    MAXLOGMEMBERS 5
    MAXDATAFILES 512
    MAXINSTANCES 8
    MAXLOGHISTORY 20157

    ......
    ......
    ......

    '/db01/oraspprd/db/apps_st/data/undo05.dbf',
    '/db01/oraspprd/db/apps_st/data/sysaux11.dbf'
    CHARACTER SET UTF8
    ;

    -- Commands to re-create incarnation table
    -- Below log names MUST be changed to existing filenames on
    -- disk. Any one log file from each branch can be used to
    -- re-create incarnation records.
    -- ALTER DATABASE REGISTER LOGFILE '/db01/archives/arch_1_1_732382724.arc';
    -- ALTER DATABASE REGISTER LOGFILE '/db01/archives/arch_1_1_732382820.arc';
    -- Recovery is required if any of the datafiles are restored backups,
    -- or if the last shutdown was not normal or immediate.
    RECOVER DATABASE USING BACKUP CONTROLFILE
    -- Create log files for threads other than thread one.
    ALTER DATABASE ADD LOGFILE THREAD 2
    GROUP 4 (
    '/db01/oraspprd/db/apps_st/data/redo1a_2.dbf',
    '/pdb03/oradata/redo1b_2.dbf'
    ) SIZE 100M REUSE,
    GROUP 5 (
    '/db01/oraspprd/db/apps_st/data/redo2a_2.dbf',
    '/pdb03/oradata/redo2b_2.dbf'
    ) SIZE 100M REUSE,
    GROUP 6 (
    '/db01/oraspprd/db/apps_st/data/redo3a_2.dbf',
    '/pdb03/oradata/redo3b_2.dbf'
    ) SIZE 100M REUSE;
    -- Database can now be opened zeroing the online logs.
    ALTER DATABASE OPEN RESETLOGS;
    -- Commands to add tempfiles to temporary tablespaces.
    -- Online tempfiles have complete space information.
    -- Other tempfiles may require adjustment.
    ALTER TABLESPACE TEMP1 ADD TEMPFILE '/db01/oraspprd/db/apps_st/data/temp02.dbf'
    SIZE 1600M REUSE AUTOEXTEND OFF;
    ALTER TABLESPACE TEMP1 ADD TEMPFILE '/db01/oraspprd/db/apps_st/data/temp01.dbf'
    SIZE 1100M REUSE AUTOEXTEND OFF;
    ALTER TABLESPACE TEMP2 ADD TEMPFILE '/db01/oraspprd/db/apps_st/data/temp04.dbf'
    SIZE 1204M REUSE AUTOEXTEND OFF;
    ALTER TABLESPACE TEMP2 ADD TEMPFILE '/db01/oraspprd/db/apps_st/data/temp03.dbf'
    SIZE 1024M REUSE AUTOEXTEND OFF;
    -- End of tempfile additions.
    --
    Remove all the lines before the line “STARTUP NOMOUNT”. Now, using CTRL-H option, change the datafiles path from that of production to one that is to be used on Test instance e.g. change the path from “/db01/oraspprd/db/apps_st/data” to “/u02/orauat/db/apps_st/data”. After that, change the following line:

    CREATE CONTROLFILE REUSE DATABASE "PROD" RESETLOGS  ARCHIVELOG

    TO

    CREATE CONTROLFILE SET DATABASE "UAT" RESETLOGS NOARCHIVELOG
    Also, remove all the lines containing the LOGFILE THREAD 2 information.

    Now, copy from the line

    "STARTUP NOMOUNT"

    till

    CHARACTER SET UTF8
    ;
    open a “createctl.sql” script on the Test Server and paste the above copied lines to this script and save it.

    Please go to the directory where DFBs and Redo Logs have been copied (e.g. /u02/orauat/db/apps_st/data) and verify that all the files have 755 permissions and are owned by Test instance’s database owner e.g. oracle.

    step 8: On Test instance, source the Database environment and go to the directory where we have created the “createctl.sql” script.

    Note: Before running the script, check your init.ora file and check the parameter log_archive_format parameter. This parameter should be same as in your prdocution instance.

    e.g., in my TEST instance it was : log_archive_format = %t_%s_%r.dbf

    However, in production it was: log_archive_format = arch_%t_%s_%r.arc

    So i modified my Test instance’s init.ora file and set log_archive_format = arch_%t_%s_%r.arc.

    Now, connect as sysdba and run the script:

    bash $ sqlplus "/as sysdba"

    connected to idle instance

    SQL> @createctl.sql
    ...
    ...
    ...

    Control File created
    Now you have to perform recovery:

    SQL> set logsource "/test01/arch"             -- The directory where you have copied the archives from production:

    SQL> recover database using backup controlfile until cancel;

    ORA-00279: change 215587587 generated at 01/04/2011 01:00:47 needed for thread
    1
    ORA-00289: suggestion : /test01/arch/arch_1_302_732382820.arc
    ORA-00280: change 215587587 for thread 1 is in sequence #302

    Specify log: {=suggested | filename | AUTO | CANCEL}
    /test01/arch/arch_1_302_732382820.arc
    ORA-00279: change 215591020 generated at 01/04/2011 01:36:06 needed for thread
    1
    ORA-00289: suggestion : /test01/arch/arch_1_303_732382820.arc
    ORA-00280: change 215591020 for thread 1 is in sequence #303
    ORA-00278: log file '/test01/arch/arch_1_302_732382820.arc' no
    longer needed for this recovery
    It will keep asking for the archive logs. Keep applying the logs till the last log available with you.

    ...
    ...

    Specify log: {=suggested | filename | AUTO | CANCEL}
    /test01/arch/arch_1_305_732382820.arc
    ORA-00279: change 215591046 generated at 01/04/2011 01:36:18 needed for thread
    1
    ORA-00289: suggestion : /test01/arch/1_306_732382820.dbf
    ORA-00280: change 215591046 for thread 1 is in sequence #306
    ORA-00278: log file '/test01/arch/arch_1_305_732382820.arc' no
    longer needed for this recovery

    Specify log: {=suggested | filename | AUTO | CANCEL}
    /test01/arch/arch_1_306_732382820.arc
    ORA-00279: change 215591052 generated at 01/04/2011 01:36:22 needed for thread
    1
    ORA-00289: suggestion : /test01/arch/1_307_732382820.dbf
    ORA-00280: change 215591052 for thread 1 is in sequence #307
    ORA-00278: log file '/test01/arch/arch_1_306_732382820.arc' no
    longer needed for this recovery
    When you have applied all the available logs, type CANCEL. Log /test01/arch/arch_1_306_732382820.arc was the last available log with me, so when it asked for log # 307, i typed CANCEL.

    Specify log: {=suggested | filename | AUTO | CANCEL}
    CANCEL
    Media recovery cancelled.
    If you receive “Media recovery cancelled.” or “Media recovery complete.”, it means recovery is successful.

    Now, when you try to open the database, you will get the following errors:

    SQL> alter database open resetlogs;

    alter database open resetlogs
    *
    ERROR at line 1:
    ORA-38856: cannot mark instance UNNAMED_INSTANCE_2 (redo thread 2) as enabled
    There is a workaround for this problem.

    SQL> shutdown immediate;

    Database closed.
    Database dismounted.
    ORACLE instance shut down.
    Now, open the initTEST.ora file and set the following parameter:

    _no_recovery_through_resetlogs=TRUE
    Save and close the file. Now again connect as sysdba and issue following commands:

    SQL> startup mount;

    SQL> alter database open resetlogs;

    Database altered.

    SQL> select open_mode from v$database;

    OPEN_MODE
    ----------
    OPEN
    Once the database is opened, you need to disable the redo thread 2 and drop its redo log groups:

    Execute the following steps for this:

    SQL> ALTER DATABASE DISABLE THREAD 2;

    SQL> ALTER DATABASE DROP LOGFILE GROUP 4;

    SQL> ALTER DATABASE DROP LOGFILE GROUP 5;

    SQL> ALTER DATABASE DROP LOGFILE GROUP 6;
    Now, add the temp files to database as mentioned in the last part of control file trace.

    SQL> ALTER TABLESPACE TEMP1 ADD TEMPFILE '/app01/oratest/TEST/db/apps_st/data/temp02.dbf' SIZE 1600M REUSE AUTOEXTEND OFF;
    SQL> ALTER TABLESPACE TEMP1 ADD TEMPFILE '/app01/oratest/TEST/db/apps_st/data/temp01.dbf' SIZE 1100M REUSE AUTOEXTEND OFF;
    SQL> ALTER TABLESPACE TEMP2 ADD TEMPFILE '/app01/oratest/TEST/db/apps_st/data/temp04.dbf' SIZE 1204M REUSE AUTOEXTEND OFF;
    SQL> ALTER TABLESPACE TEMP2 ADD TEMPFILE '/app01/oratest/TEST/db/apps_st/data/temp03.dbf' SIZE 1024M REUSE AUTOEXTEND OFF;
    SQL> exit;
    Now go to $ORACLE_HOME/appsutil/install/ directory:

    bash $ cd $ORACLE_HOME/appsutil/install/

    bash $ sqlplus "/as sysdba"

    SQL> @adupdlib.sql so

    PL/SQL procedure successfully completed.

    SQL> exit
    Now, go to $ORACLE_HOME/appsutil/clone/bin/ and run the following command. Please note that the Database and the Listener should be up when you run this command.

    bash $ perl adcfgclone.pl dbconfig $CONTEXT_FILE
    step 9: Run autoconfig on DB Tier.

    step 10: Run autoconfig on Apps Tier.

    step 11:

    On Apps Tier, go to $AD_TOP/bin and run:

    bash $ perl admkappsutil.pl
    It will create appsutil.zip file in $APPL_TOP/admin/out directory.

    Copy this file to your DB ORACLE_HOME and unzip it there:

    bash $ cd $ORACLE_HOME

    bash $ unzip -o appsutil.zip
    Then run autoconfig again on DB tier.

    SQL> shutdown immediate;
    Open your init.ora file and remove the parameter _no_recovery_through_resetlogs=TRUE which we set in step 8.

    SQL> startup
    Bring up the Application tier Services.

    Thats it. Cheers, you have successfully refreshed your Test database from production.

    Hope this helps.

    Sunday, September 15, 2013

    How to Create a Read Only Schema in Oracle R12.

    How to Create a Read Only Schema in Oracle R12. 

    Method :1 

    SQL> CREATE USER APPSREAD IDENTIFIED BY APPSREAD;   
    User created. 
    SQL> 

    SQL> GRANT CONNECT, RESOURCE,CREATE SYNONYM TO APPSREAD;
    Grant succeeded.   
    SQL> 

    Generate a Script for creating database objects of Application User ‘APPS’

    set echo off set
    pagesize 0
    set linesize 300
    spool cr8synonyms.sql
    select 'create synonym ' || OBJECT_NAME || ' for '|| OWNER ||'.' ||OBJECT_NAME || ';' from all_objects where OWNER in ('APPS') and 
    OBJECT_NAME not like '%/%' and OBJECT_TYPE in ('TABLE','VIEW','SYNONYM');   
    spool off 

    Generate a script for selecting database objects of Application User ‘APPS’

    spool GrantSelect.sql   
    select 'grant select on '|| OWNER ||'.' ||OBJECT_NAME || ' to APPSREAD;' from all_objects  where OWNER not in ('SYS','SYSTEM') and OBJECT_NAME not like '%/%' and OBJECT_TYPE in ('TABLE','VIEW','SYNONYM');   
    spool off 

    Connect to sqlplus  as sysdaba and execute the following script

    SQL> @GrantSelect.sql 
    SQL> @cr8synonyms.sql 

    Connect to Read only schema User and check the objects.

    SQL> conn oracle/oracle Connected. 
    SQL> select count(*) from tab;     
    COUNT(*) ----------      15515   
    SQL>

    Thursday, September 12, 2013

    Missing FNDSM and FNDIM Services After Cloning or CLEAR NONEXISTENT FND_NODES

    Missing FNDSM and FNDIM Services After Cloning or CLEAR NONEXISTENT FND_NODES

    AFTER CLEAR NONEXISTENT FND_NODES, FNDFS and FNDSM NOT COMMING UP 

    However, now the Concurrent Manager cannot be started. The following error is produced in the Internal Concurrent Manager log file :

    Symptoms

    Could not start Service Manager FNDSM_hostname.
    The TNS alias could not be located, the listener process on hostname could not be contacted, or the listener failed to spawn the Service Manager process.

    Process monitor session started : 28-MAY-2008 10:15:28

    Could not contact Service Manager FNDSM_TEST_UAT_dev. The TNS alias could not be located, the listener process onTEST_UAT could not be contacted, or the listener failed to spawn the Service Manager process.

    Could not contact Service Manager FNDSM_TEST_dev. The TNS alias could not be located, the listener process on TEST could not be contacted, or the listener failed to spawn the Service Manager process.

    Could not contact Service Manager FNDSM_APPSTEST1_dev. The TNS alias could not be located, the listener process on APPSTEST1 could not be contacted, or the listener failed to spawn the Service Manager process.

    Could not initialize the Service Manager FNDSM_CHEN_dev. Verify that APOLLO has been registered for concurrent processing.
    Routine AFPEIM encountered an error while starting concurrent manager INVTMRPM with library /11i/applmgr/devappl/inv/11.5.0/bin/INCTM.


    Check that your system has enough resources to start a concurrent manager process. Contact your system administra : 28-MAY-2008 17:34:44
    Could not find service instance context for service instance number 1027
    Could not find service instance context for service instance number 1035
    Could not find service instance context for service instance number 1039
    Could not find service instance context for service instance number 1036

    Starting FNDCRM Concurrent Manager : 28-MAY-2008 17:34:44

    Could not initialize the Service Manager FNDSM_CHEN_dev. Verify that APOLLO has been registered for concurrent processing.
    Routine AFPEIM encountered an error while starting concurrent manager FNDCRM with library /11i/applmgr/devappl/fnd/11.5.0/bin/FNDCRM.

    Check that your system has enough resources to start a concurrent manager process. Contact your system administrat : 28-MAY-2008 17:34:44

    Starting INVMGR Concurrent Manager : 28-MAY-2008 17:34:44
    Could not initialize the Service Manager FNDSM_CHEN_dev. Verify that CHEN has been registered for concurrent processing.
    Routine AFPEIM encountered an error while starting concurrent manager INVMGR with library /11i/applmgr/devappl/inv/11.5.0/bin/INVLIBR.


    Solution

    Run the following select on the target node only to check trigger status :

    SELECT trigger_name , status
    FROM user_triggers
    WHERE table_name = 'FND_NODES' ;

    If status of the triggers show as DISABLED, then enable these following triggers as follows :

    connect apps/

    alter trigger UPNAME enable;
    alter trigger FNDSM enable;

    Take backup of FND_NODES table in Target : 

    create table FND_NODE_bk as select * from FND_NODES ;

    1. Login into Oracle Application with System Administrator Responsibility.
    2. Delete the rows from FND_NODES table in target using install -> node -> Define form.
    3. Then re-Register TRAGET hostname.
    4. This should register FNDIM_ and FNDSM_ concurrent managers in FND_CONCURRENT_QUEUE Table.

    Then

    Check the following Scripts it will give node name. If not give any out put please run that below sql scripts.

    SQL> select concurrent_queue_name, node_name from fnd_concurrent_queues where
    manager_type=6;

    From the Application tier:

    SQL> sqlplus apps/apps

    1. Log in as applmgr
    2. cd to $FND_TOP/patch/115/sql
    3. Run the script: afdcm037.sql
    4. This script make libraries for FNDSM and create Managers for Preexisting Nodes.


    Now you check

    ps -ef grep FNDSM
    ps -ef grep FNDCRM


    Note ID: Note:305986.1

    Friday, September 6, 2013

    How to change the default branding on the homepage which shown as "E-Business Suite" ?

    How to change the default branding on the homepage which shown as "E-Business Suite" ?


    Oracle Applications Framework - Version 12.0.3 to 12.0.4 [Release 12]
    Information in this document applies to any platform.
    ***Checked for relevance on 02-Feb-2010***
    ***Checked for relevance on 04-Mar-2013***

    GOAL

    How to replace the default branding shown as E-Business Suite on homepage in R12 with a custom text ?

    FIX

    1. Login with system administrator responsibility

    2. Navigate: Application ---> Function

    3. Query the function FWK_HOMEPAGE_BRAND

    4. Replace the User Function Name with the desired text

    5. Query the function OAHOMEPAGE

    6. Click on tab web_html_call

        It may be set to the following :

         OA.jsp?page=/oracle/apps/fnd/framework/navigate/webui/HomePG&homePage=Y
    7. Change the value of web_html_call to the following

    OA.jsp?page=/oracle/apps/fnd/framework/navigate/webui/HomePG&homePage=Y&OAPB=FWK_HOMEPAGE_BRAND
    8. Logout, login and the change should be visible immediate  

    R12 - How To Change The Forms Logo On The Right Hand Side Of The Navigator

    R12 - How To Change The Forms Logo On The Right Hand Side Of The Navigator

    Solution

    This document is being delivered to you via Oracle Support's Rapid Visibility (RaV) process and therefore has not been subject to an independent technical review.
    APPLIES TO:

    Oracle Applications Technology Stack - Version: 12.1.1 and later   [Release: 12.1 and later ]
    Information in this document applies to any platform.
    GOAL


    === ODM Question ===

    R12: Ebusiness suite

    How to change the Oracle logo on the right hand side of the navigator in forms?

    See Logo_To_Change attachment


    SOLUTION


    === ODM Answer ===

    The idea here is to replace the logo in frmall.jar. Then reload it.

    cp $ORACLE_HOME/forms/java/frmall.jar $ORACLE_HOME/forms/java/frmall.jar.BAK
    cp $ORACLE_HOME/forms/java/frmall.jar /tmp/test
    cd /tmp/test
    jar -xvf frmall.jar
    rm -rf META-INF/
    copy your own oracle_logo_light.gif to oracle/forms/icons/oracle_logo_light.gif
    cd /tmp/test
    jar -cvf frmall.jar *
    cp frmall.jar $ORACLE_HOME/forms/java/frmall.jar

    adadmin (jar regenerate)  and use the FORCE option

    Retest the issue

    R12 - How To Change The Forms Logo On The Right Hand Side Of The Navigator

    R12 - How To Change The Forms Logo On The Right Hand Side Of The Navigator

    Solution

    This document is being delivered to you via Oracle Support's Rapid Visibility (RaV) process and therefore has not been subject to an independent technical review.
    APPLIES TO:

    Oracle Applications Technology Stack - Version: 12.1.1 and later   [Release: 12.1 and later ]
    Information in this document applies to any platform.
    GOAL


    === ODM Question ===

    R12: Ebusiness suite

    How to change the Oracle logo on the right hand side of the navigator in forms?

    See Logo_To_Change attachment


    SOLUTION


    === ODM Answer ===

    The idea here is to replace the logo in frmall.jar. Then reload it.

    cp $ORACLE_HOME/forms/java/frmall.jar $ORACLE_HOME/forms/java/frmall.jar.BAK
    cp $ORACLE_HOME/forms/java/frmall.jar /tmp/test
    cd /tmp/test
    jar -xvf frmall.jar
    rm -rf META-INF/
    copy your own oracle_logo_light.gif to oracle/forms/icons/oracle_logo_light.gif
    cd /tmp/test
    jar -cvf frmall.jar *
    cp frmall.jar $ORACLE_HOME/forms/java/frmall.jar

    adadmin (jar regenerate)  and use the FORCE option

    Retest the issue

    Thursday, September 5, 2013

    IAP-CANNOT READ FIELD (FIELDNAME=PARAMETER.CONFIG) While Opening Log And Out Of Concurrent Requests

    IAP-CANNOT READ FIELD (FIELDNAME=PARAMETER.CONFIG) While Opening Log And Out Of Concurrent Requests


    In this Document
    Symptoms
    Cause
    Solution
    References

    This document is being delivered to you via Oracle Support's Rapid Visibility (RaV) process and therefore has not been subject to an independent technical review.
    APPLIES TO:

    Oracle Concurrent Processing - Version 12.1.3 and later
    Information in this document applies to any platform.
    SYMPTOMS

     While Opening Log And Out Of Concurrent Requests the following error appear:

    "IAP-CANNOT READ FIELD (FIELDNAME=PARAMETER.CONFIG)"

    CAUSE

    The APPLCSF parameter not correctly set.

    Because the out and log files are on INST_TOP, should have been there in shared file system as we are using multinode application tier, share apple top and PCP.

    SOLUTION

    Need to add, APPLCSF parameter to shared location from which all nodes in the application tier can read and open the files.

    Wednesday, September 4, 2013

    Missing responsibilities in R12.1.3


    Missing responsibilities in R12.1.3


    Oracle Workflow Cartridge - Version 12.1.3 to 12.1.3 [Release 12.1]
    Information in this document applies to any platform.
    SYMPTOMS


    When a new responsibility is added, it doesn't show up in the home page. The same problem happens even after clearing cache and removing cookies. Workflow Directory tables don't show corruption.


    CAUSE


    LONG_RUNNING_JVM parameter was set to FALSE. TRUE is recommended value for R12.1.3.

    This was the value for this parameter.
    $ cd $ORA_CONFIG_HOME/10.1.3/j2ee/oacore/config
    $ grep -i long_running oc4j.properties
    LONG_RUNNING_JVM=false

    Since the cache was not refreshed, the responsibilities didn't show up in the home page.
    SOLUTION


    To implement the solution, please execute the following steps:

    1. Change the LONG_RUNNING_JVM parameter to TRUE in the context file and run the autoconfig

    2. Make sure the change is propagated to oc4j.properties
    $ cd $ORA_CONFIG_HOME/10.1.3/j2ee/oacore/config
    $ grep -i long_running oc4j.properties

    3. Bounce oafm

    sh $ADMIN_SCRIPTS_HOME/adoafmctl.sh stop
    sh $ADMIN_SCRIPTS_HOME/adoafmctl.sh start

    4. Retest the issue.

    5. Migrate the solution as appropriate to other environments.

    Tuesday, September 3, 2013

    adoacorectl - ERROR : Timed out( 100000 ): Interrupted Exception:

    adoacorectl - ERROR : Timed out( 100000 ): Interrupted Exception:

    Please look at all 3 possible solution provided below:
    Errors:
    Description: cid:image001.png@01CD43C7.4A031000
    ****************************************************
    Executing service control script:
    /app/oracle/product/applts2/inst/apps/ebsts2_ebsapuat/admin/scripts/adoacorectl.sh start
    script returned:
    ****************************************************
    ERROR : Timed out( 100000 ): Interrupted Exception
    You are running adoacorectl.sh version 120.13
    Starting OPMN managed OACORE OC4J instance  ...
    ****************************************************
    From the log files:
    12/06/06 07:58:08 WARNING: ApplicationLogManager is not installed, may result in loader leaks. Set -Djava.util.logging.manager=oracle.classloader.util.ApplicationLogManager
    12/06/06 07:58:09 WARNING: Unable to access loaded classes.
    12/06/06 07:58:11 WARNING: GC: Unable to access pending References.
    12/06/06 07:58:11 WARNING: GC: Unable to access pending Reference lock.
    Solution 1:
    delete all .lock files from the below directory subtrees:
    $INST_TOP/ora/10.1.3/j2ee/forms/persistence/forms_default_group_1/
    $INST_TOP/ora/10.1.3/j2ee/oacore/persistence/oacore_default_group_1/
    $INST_TOP/ora/10.1.3/j2ee/oafm/persistence/oafm_default_group_1/
    Shutdown oacore, and remove all .lock files in the directory subtree of :
    find $INST_TOP/ora/10.1.3/j2ee/forms/persistence/forms_default_group_1/ -name *.lock
    find $INST_TOP/ora/10.1.3/j2ee/oacore/persistence/oacore_default_group_1/  -name *.lock
    find $INST_TOP/ora/10.1.3/j2ee/oafm/persistence/oafm_default_group_1/ -name *.lock
    Description: cid:image003.png@01CD43C8.D32E00A0
    Restart using adstrtal.sh
    Solution 2:
    If not resolved, follow the below timeout workaround from Oracle:
    The timeout value is defined in the $ORA_CONFIG_HOME/10.1.3/opmn/conf/opmn.xml file   There are three entries to be concerned about, one for each of the managed OC4J containers (oacore, forms and oafm).  The entry is shown below the appropriate "process-type id=" section and looks like shown below by default:-

    Modifying the timeout value from "600" to "1800" may resolve the timeout error . You can only set it for entry “process-type id="oacore"” 
    or all entries giving timeout errors

    Before:

    ebsapuat(applts2):/app/oracle/product/applts2> grep 'start timeout' $ORA_CONFIG_HOME/10.1.3/opmn/conf/opmn.xml


    ebsapuat(applts2):/app/oracle/product/applts2>
    After:
    ebsapuat(applts2):/app/oracle/product/applts2> grep 'start timeout' $ORA_CONFIG_HOME/10.1.3/opmn/conf/opmn.xml


    ebsapuat(applts2):/app/oracle/product/applts2>

    Solution 3:

    Decrease the number of oacore processes started in the $CONTEXT_FILE to see if this is not maybe resource related, or as a result of the server running out of resources
    You might need to look at the O/S parameters should it start with a reduced number of processes.

    With this set, I got the “TIMEOUT” errors:

    ebsapuat(applts2):/app/oracle/product/applts2/inst/apps/ebsts2_ebsapuat/appl/admin> grep nprocs $CONTEXT_FILE
             1
             3
             5
             1
             0
    ebsapuat(applts2):/app/oracle/product/applts2/inst/apps/ebsts2_ebsapuat/appl/admin>


    But after changing it to ths below, adoacorectl.sh started without any errors:

    ebsapuat(applts2):/app/oracle/product/applts2/inst/apps/ebsts2_ebsapuat/appl/admin> grep nprocs $CONTEXT_FILE
             1
             1
             1
             1
             0
    ebsapuat(applts2):/app/oracle/product/applts2/inst/apps/ebsts2_ebsapuat/appl/admin>


    Timed out( 100000 ): Interrupted Exception

    Exception.Error Starting adoacorectl.sh

    Sunday, March 24, 2013 ·


    Executing service control script:
    /u01/finsys/inst/apps/PROD_ebstest/admin/scripts/adoacorectl.sh start
    script returned:
    ****************************************************
    ERROR : Timed out( 100000 ): Interrupted Exception
    You are running adoacorectl.sh version 120.13
    Starting OPMN managed OACORE OC4J instance...
    ****************************************************

    Solution 1:
    delete all .lock files from the below directory subtrees:
    $INST_TOP/ora/10.1.3/j2ee/forms/persistence/forms_default_group_1/
    $INST_TOP/ora/10.1.3/j2ee/oacore/persistence/oacore_default_group_1/
    $INST_TOP/ora/10.1.3/j2ee/oafm/persistence/oafm_default_group_1/


    Solution 2:
    If not resolved, follow the below timeout workaround from Oracle:
    The timeout value is defined in the $ORA_CONFIG_HOME/10.1.3/opmn/conf/opmn.xml file   There are three entries to be concerned about, one for each of the managed OC4J containers (oacore, forms and oafm).  The entry is shown below the appropriate "process-type id=" section and looks like shown below by default:-

    Modifying the timeout value from "600" to "1800" may resolve the timeout error . You can only set it for entry “process-type id="oacore"” 
    or all entries giving timeout errors

    Sunday, September 1, 2013

    MWA Configuration File: Configure mwa.cfg

    • MWA Dispatcher port number usage: 170939.1
    • MWA Dispatcher usage and example: 198543.1

    Overview of the Mobile Supply Chain Application Server

    The Oracle Mobile Supply Chain Applications Server is a java based mobile server that supports the Telnet Protocol. The Telnet Server module has two sub-modules:
    • Telnet Protocol Handler- Functions as the communication module between the client and the rest of the Telnet.
    • Presentation Manager- Implements the telnet protocol that actually renders the user interface on the connected telnet client.
    The following illustration depicts how a mobile application request is handled:
    Mobile Application Request Sequence
    the picture is described in the document text
    • The client connects to Telnet Listener over a specified port—protocol negotiation occurs on the first communication. The Telnet Listener gathers input and waits for an event.
    • When an event occurs, the presentation manager generates an event and passes it to the controller.
    • The controller handles this event and modifies the appropriate business objects.
    • The business object returns an updated session back to the controller.
    • The controller informs the presentation manager of the updated session.
    • The presentation manager examines the user session, renders the current page, and returns it to the client.

    MWA Server Setup

    The following paragraphs contain information on how to setup the MWA server.

    MWA Configuration File: Configure mwa.cfg

    The following procedure lists the steps necessary to configure the mwa.cfg file.
    1. Locate the mwa.cfg file in the $INST_TOP/admin/install directory.
    2. Copy the file Mwa_template.cfg to the file mwa.cfg
    3. Edit the mwa.cfg file and configure following parameters
      1. Set mwa.DbcFolder=full directory of folder containing the .dbc file ending with “/”.
      2. Set mwa.DbcFile=dbc file name
      3. Set mwa.logdir=full directory of log file
      4. Set mwa.TelnetPortNumber=default port#
      5. Setmwa.DropConnectionTimeout= no. of minutes
      6. Set mwa.StaleSessionTimeout= no. of minutes
      7. Set mwa.LogLevel=error or trace

    Key Mappings: Configure default_key.ini

    The following procedure lists the steps necessary to configure the default_key.ini file.
    1. Locate the default_key.ini file in the $INST_TOP/admin/install directory.
    2. Use the default_key.ini file if you do not need to make any changes.
    3. If you need to make customizations, create a new file e.g. intermec2415_key.ini
      1. Associate Server-Defined actions to Device keys:
        == eg. MWA_CLEAR_FIELD=CONTROLK=Clear
      2. Specify a device

    Device IP: Configure Device IP.ini

    The following procedure lists the steps necessary to configure the deviceIP.ini file.
    1. Locate the deviceIP.ini file in the $INST_TOP/admin/install directory.
    2. Copy the deviceIP_template.ini file to the deviceIP.ini file. This file associates a device with a key mapping file.
    3. Map the device name and IP address as follows:
      1. Mapping by device name: Intermec 2415=intermec2415_key.ini
      2. Mapping by IP address: 130.35.112.*=intermec2415.ini

    Verify Environment

    To ensure you installed your environment properly, verify the following information:
    • Verify the telnet port and the next consecutive port is not in use i.e. 2323 and 2324.
    • The environment was set by sourcing the APPLSYS.env file.
    • $INST_TOP and $MWA_TOP is set correctly.
    • The DbcFolder and DbcFile in the mwa.cfg file is set to the location and file name of your Oracle Application .dbc file.
    • The log directory exists.
    • The $CLASSPATH includes appsborg.zip and apps.zip.

      Note: If APPS.zip is larger than 64k, apply patch 2729622. Follow the instructions in the readme file to apply the patch. After you apply the patch successfully, update the $CLASSPATCH in replacing /apps.zip by .

    Configure MWA Dispatcher

    Use the following procedures to configure and manage the dispatcher to perform load balancing among multiple MWA servers.

    Setup Dispatcher parameters in mwa.cfg

    The following procedure lists the steps required to setup dispatch parameters in the mwa.cfg file.
    1. Specify the port number and machine for running the dispatcher where
      mwa.Dispatcher=hostname:port#

      Note: The dispatcher uses three consecutive ports for internal control.
    2. Specify the dispatcher worker thread count where
      mwa.DispatcherWorkerThreadCount=15
    3. Specify the dispatcher clients per worker where
      mwa.DispatcherClientsPerWorker=10

    Running MWA Server

    The following paragraphs describe how to run the MWA server.

    Starting the MWA Telnet Server

    To start the MWA telnet server complete the following procedure (at a UNIX/LINUX prompt):
    1. Source the APPLSYS.env
    2. Enter the following text:
        cd $INST_TOP/admin/scripts
      
      
    3. Enter the following text:
        mwactl.sh start [port number]


    Shutting Down the MWA Telnet Server

    To shutdown the MWA telnet server complete the following procedure (at a UNIX/LINUX prompt):
    1. Enter the following text:
       cd $INST_TOP/admin/scripts
      
      
    2. Enter the following text where xxx is application user id with system administrator responsibility or a valid database user and yyy is the application user password.
      mwactl.sh-login xxx/yyy stop [port number] 


    Additional Information

    You can use the following information while running the MWA server.
    • For NT servers, use mwactl.cmd script to start/stop MWA servers
    • Use appropriate OS commands to ensure the MWA server continues running after the current connection closes (usually nohup, and/or &)
    • You can use the following command to find currently running MWA servers: ps-ef|grep mwa

    Starting/Shutting down the MWA Servers and Dispatcher

    You can use the MWA Dispatcher to balance user load across many MWA Servers. Users connect to a single dispatcher port. The Dispatcher then re-directs each connection to one of the available servers associated with that dispatcher.

    Starting the MWA Servers and Dispatcher

    To start two MWA servers and the MWA Dispatcher complete the following procedure (at a UNIX/LINUX prompt):
    1. Source the APPLYSYS.env.
    2. Enter the following text:
      cd $INST_TOP/admin/scripts
      
      
    3. Enter the following text to start the server:
       mwactl.sh start 2310 (or any port number)
      
      
    4. Enter the following text to start the server:
      mwactl.sh start 2320 (or any other port number).
      
      
    5. Enter the following text to start the dispatcher:
       mwactl.sh start_dispatcher
      
      
      You connect to the Dispatcher port 2300. The dispatcher distributes mobile users between the two MWA servers. You can select control-X to view the MWA server port#, host name and other connection information.

    Shutting Down the MWA Servers and Dispatcher

    To shutdown the MWA servers and the MWA Dispatcher complete the following procedure (at a UNIX/LINUX prompt):
    Source the APPLYSYS.env.
    1. Enter the following text:
       cd $INST_TOP/admin/scripts
      
      
    2. Enter the following text where xxx is application user id with system administrator responsibility or a valid database user, yyy is the application user password, and 2310 is the port number of the first server.
       mwactl.sh-login xxx/yyy stop 2310  
      
      
    3. Enter the following text where xxx is application user id with system administrator responsibility, yyy is the application user password, and 2320 is the port number of the second server.
    4. mwactl.sh-login xxx/yyy stop 2320
    5. Enter the following text:
       mwactl.sh stop_dispatcher. 


      Note: The MWA server terminates only when all mobile users are disconnected. New users cannot sign-on when the server is stopped. If you want to terminate the server while users are connected, you can use the stop_force command in place of the stop command to stop the server immediately.

    Alternating MWA Servers and Dispatcher

    You can establish a rotation of multiple MWA servers managed in conjunction with the dispatcher to avoid impacting daily operations. For Example: You can use one Dispatcher to manage to sets of MWA Servers (MWA Servers Set A and MWA Servers Set B respectively). You can set the rotation as follows:
    Servers
    MWA ServersWeek 1Week 2Week 3
    MWA Servers Set A12:00am start12:05 am stop12:00am start
    MWA Servers Set B12:05 am stop12:00am start12:05 am stop
    You can adjust the times and numbers of servers to match you shift schedule and volume of users.

    Accessing MWA Server

    You can use a telnet client to access the Oracle Applications Mobile User Interface. Connect to the machine where the MWA server is running on the port number where the server has been started or on the port number of the dispatcher.
    For example, if the MWA server was started on mwa.oracle.com on port 2323, then you use a telnet client access to the Oracle Applications UI to connect to mwa.oracle.com on port 2323. To access the UI from a mobile device, you configure the telnet client on the device to access the IP of the machine on the appropriate port. To access the UI from a desktop computer, you can use a compatible telnet client to connect to the appropriate machine and port number.
    Note: The default telnet client that ships with Windows 2000 and later is not compatible with character mode User interfaces using the telnet protocol, which includes the Oracle Applications Mobile UI. Refer to the Microsoft Knowledge Base Article #253918 (http://support.microsoft.com/default.aspx?scid=kb;en-us;Q253918) for more information. As per the instructions on this support note, to use a GUI based telnet client on a Windows 2000 machine, it is necessary to copy the telnet client that shipped with Windows NT or obtain a third party telnet client software.

    After you complete the change recommended in the knowledge base article, you can access the mobile UI. Launch the following executable from a command prompt where server.mwa.com represents the machine, and 2323 represents the port number: telent32.exe ap100.mwa.com 2323.